![]()
Files
This section explains how to work with library files
For a definition of the term “files,” see Terms Used in this Chapter.
Copying Files to the Library
Files must be copied to the Ektron CMS400.NET library before users can insert them into content. To copy a file to the library, follow these steps.
Warning! Ektron recommends using the Document Management system to add files. Unlike library files, DMS files can be part of an approval chain, maintain a history, are searchable, and can have a summary, schedule, metadata, taxonomy categories, etc.
Technical Note
Note: Microsoft lets users upload files of any name. However, IIS security blocks files whose name contains an ampersand (&), colon (:), or percentage sign (%). Source: http://support.microsoft.com/kb/826437/en-us
To allow these characters, add the following registry key to your Web server then reset IIS.
Reg Key: DWORD HKEY_LOCAL_MACHINE\SOFTWARE\Microsoft\ASP.NET VerificationCompatibility = 1.
1. In the Workarea, browse the library folder and select a folder to which you want to copy a file.
Note: When you copy a file to a folder, only users with permissions to that folder can insert the file into content.
2. A list of files in that folder appears.
3. Click Add Library ( ).
).
4. The Add File screen appears.

5. Enter the necessary information according to the following table.
|
Field |
Description |
|
Title |
Enter a title for the file to be copied. |
|
Filename |
Enter the path to the file to be copied. You can use the Browse button to find it. |
|
Description |
You can enter a full text description to help other users identify this file. The Description appears on the View File screen. It also accompanies the file on the Search Results screen if the user selects Mixed when viewing results. See Also: Displaying Search Results |
After you enter the necessary information and click the Save button, the file is copied. Now, users with permissions to the selected folder can insert the file into their content.
See Also: Adding a Library File to Content
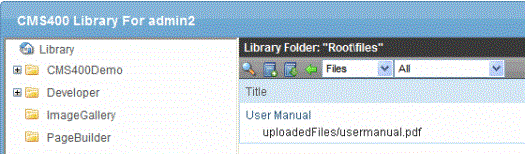
Viewing Files
Once a file is copied to the library, you may preview it. To preview a copied file, follow these steps.
1. Navigate to the library folder to which the file was copied.
2. Click the file you want to preview.
3. The View File screen appears.
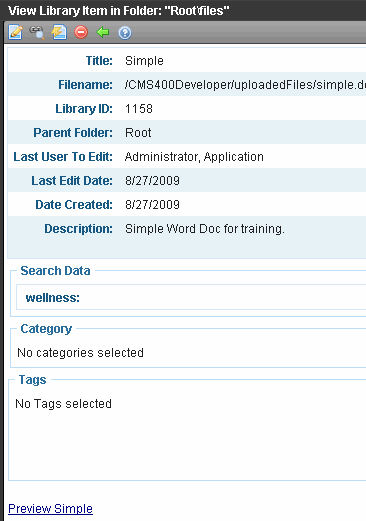
The table below describes each field on the screen.
|
Field |
Description |
|
Title |
Title assigned by user who copied or edited it. |
|
Filename |
Filename and location on the server. |
|
Library ID |
ID number assigned by Ektron CMS400.NET when file was originally copied. |
|
Parent Folder |
File’s parent folder. Users need permissions to this folder to insert the file into content. |
|
Last User to Edit |
Last user who changed file. |
|
Last Edit Date |
When file was last edited. |
|
Date Created |
When file was originally copied to library. |
|
Description |
Optional, full-text description of file. |
If the file can be displayed in your browser, a preview of it appears at the bottom of the screen. If it cannot display in the browser, a link to preview it in its host application appears instead.
Note: You may need to download some files before you can be view them (for example, .mdb, .mp3, .zip, etc.).
The following table describes the buttons on the View Library Item screen.
|
Button |
Description |
For more information, see |
|
|
Edit the items title and description |
|
|
|
Overwrite the library item |
|
|
|
Find content linked to the library item |
|
|
|
Delete library item |
|
|
|
Return to previous screen |
|

Editing a File
You can edit the title, filename and description of any file that was copied to the library. To do so, follow these steps.
1. Access the View File screen, as described in Viewing Files.
2. Click Edit ( ).
).
3. The Edit File screen appears.
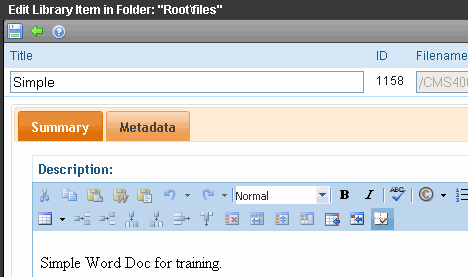
4. Change the title, file name, and/or description of the file.
5. Click Update ( ).
).
Overwriting Files
If a library file becomes out of date or the wrong version was copied, you may replace it with a new version. Overwriting files lets you minimize disk space and the number of library files.
Note: The ability to overwrite a library file is a privilege granted by the system administrator. If you do not see an Overwrite button ( ) on the View Library Item in Folder screen, you do not have permission to overwrite.
Note: You can only overwrite images and files. The new image or file must have the same file extension as the file being replaced.
Before You Overwrite an Image
When overwriting an image, the new image uses the same size dimensions and file extension as the older image. Be sure that the two images have the same file extension and size or make the adjustments at each occurrence of the image.
Before You Overwrite a File
Remember, all links that point to the overwritten file now point to the new file.
Overwriting Library Assets
To overwrite a library file, follow these steps.
1. Navigate to the View File screen for the file you want to overwrite, as described in Viewing Files.
2. Click Overwrite ().
3. The Overwrite File screen appears.
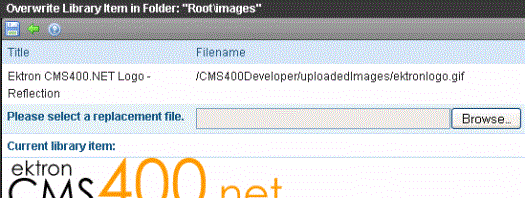
4. Click Browse.
5. A window lets you navigate to the new file.
6. Click the file, then click Open.
7. You return to the Overwrite File screen with the path to the new file in the Filename field.
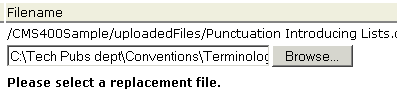
8. If desired, enter a Description for the new file.
9. To overwrite the current version of the file with this version, click Update ().
10. The following message appears.
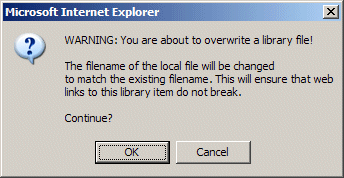
11. To overwrite the file, click OK.
Library Link Searching
Link searching indicates all content that includes a library link. It is useful when you want to delete a library item. With the click of a button, you see all content that you need to update to reflect the change you are making.
Performing a Library Item Link Search
To perform a library item link search, follow these steps.
1. Access the View Library Item for any type of library item, as described in Viewing Files.
2. Click Link Search ( ).
).
3. A list of all content that references the library item is displayed.
You should edit that content before deleting the item.
Deleting Library Items
You can delete obsolete items from the library. By deleting an item, you prevent users from adding it to their content. A deleted hyperlink, quicklink or form quicklink remains on your Web server, so any existing links to them are not broken.
On the other hand, if an item is a file or image, the delete window displays an additional prompt, Remove from the server, that lets you remove the item from the server. This feature is available to help reduce disk space taken up by these files. Before removing an image or file from your server, you should review all content with links to it and remove or update the link. See Also: Library Link Searching
To delete an item from the library, follow these steps.
1. Access the View Library Item for any type of library item, as described in Viewing Files.
2. Click Delete ( ).
).
3. The Delete Library Item screen is displayed.
4. If appropriate, check the box next to Remove from the server (see above).
5. Click Delete ().
Adding a Library File to Content
After a file is copied to the library, users can add it to content. (See Adding a Library File to Content)
You can also insert an item into the library while adding it to content. (See Adding a File to the Library and Inserting it into Content)
If you insert an image file, it appears within the content. If you add any other type of file, the file name appears as a hyperlink within the content. When a site visitor viewing that page clicks the hyperlink, the inserted file is launched.
Adding a Library File to Content
1. Invoke the editor by adding or editing content in Ektron CMS400.NET.
2. Place the cursor within the content where you want the library file to appear.
3. Click Library ( ).
).
4. The library opens.
5. Navigate to the folder that contains the file you want to insert.
6. From the file types dropdown list, select the kind of file you want to insert.
7. All library files of that type in the selected folder appear on the screen.
8. Click the file you want to insert.
9. Click Insert (![]() ) to insert the file.
) to insert the file.
10. A hyperlink to the file appears in your content.
You can click the link to open the file.
The Insert QuickLink Dialog
If you select Files from the file types list, and Aliasing is enabled for your web site, the following screen appears.
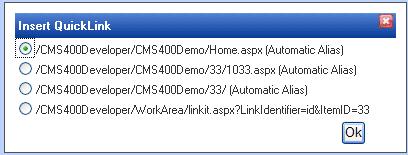
For guidance on these choices, see http://dev.ektron.com/kb_article.aspx?id=26950.
Adding a File to the Library and Inserting it into Content
Use this procedure to insert an image into content that has not yet been copied to the library. This procedure inserts the item into the library then into the content.
1. Invoke the editor by adding or editing content in Ektron CMS400.NET.
2. Place the cursor where you want the library item to appear.
3. Click Library ().
4. The library opens.
5. Navigate to the folder that will contain the file after you insert it.
6. From the File types dropdown, select the type of file you want to insert. See Also: Terms Used in this Chapter
7. Click Add Library ().
8. A new screen appears. Browse to the file you want to insert.
Or you can click Search ( ) to search for a file to insert.
9. Enter a Title for the file.
10. If metadata is required for the library item, you must complete it. Metadata fields may appear in the lower section of the screen.
11. Click Add Library ().
12. The file is inserted into the selected library folder and the content.


![]()